You can start your renewal process on your dashboard by going into your “Clients” tab, searching for your client, and clicking the “Renew” button to the right of their name.
The application will be pre-filled. To complete the renewal, you will simply click through the application, make any updates that are needed, choose a plan, and submit your renewal.
With Multiple Enrollment Groups, it’s easy to place applicants in different plans on the same application.
When it may be useful to select multiple plans for a single application
When applicants have different health needs
When applicants have different provider needs
When applicants have different prescription drug needs
Summary of how it works
After filling out the application, you’ll be able to shop different plans for different applicants
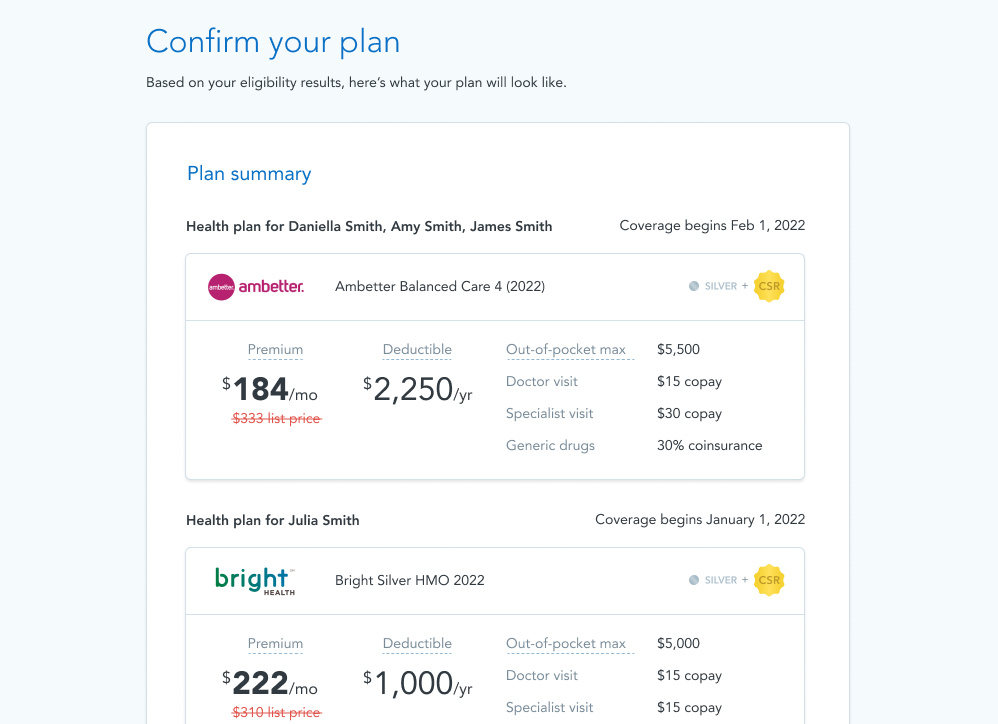
Applicants on their own plan have their own separate premium payment, deductible, out-of-pocket max.
If any applicants are on the same plan, they’ll be in a “group” – on the same premium payment, family deductible, and family out-of-pocket max.
The subsidy for the household will be portioned out between applicants using a formula from CMS. If an applicant doesn’t use all of their subsidy portion, it goes to the other applicants.
How to access Multiple Enrollment Groups
You’ll have access to shop Multiple Enrollment Groups after you’ve done the application, not during Quoting.
The easiest way to access Multiple Enrollment Groups is through our EDE application flow – but it’s also possible on the double-direct application flow.
At the end of the EDE flow, you’ll reach the Eligibility Results page. If you haven’t already chosen a plan, you’ll see the “Shop Multiple Plans” button at the bottom.
You’ll also always have access to shop multiple plans from the final Confirm Plans page. (This is where you’ll see the link for the first time if you’ve done a double-redirect application.)
If you haven’t already selected multiple plans, you can do so here with the “Shop multiple plans” button. If you have already selected multiple plans, you can edit the plans with the “Change plans” button.
Group shopping
When you click the Shop Multiple Plans button, you’ll land here on the Group Shopping page. First, select which applicants you’d like to shop for, then press “Choose a plan.”
From there you’ll be taken to the Plan List where you can shop plans for those selected applicants. As you shop, you’ll see the subsidy portion for those particular applicants applied to the plans (using the per-applicant subsidy formula from CMS). Add the chosen plan to your cart and press “Choose plan” from the cart to be taken back to the Group Shopping page.
Any applicants that have the same plan selected will be put into a “group” – meaning the same premium payment, family deductible, and family out-of-pocket max (just like normal). This grouping is made more clear on the Confirm Plans page.
Once you’ve shopped for everyone, click “Continue” to proceed to the Confirm Plans page, where you’ll see all the plans and groupings you’ve selected.
Post-enrollment
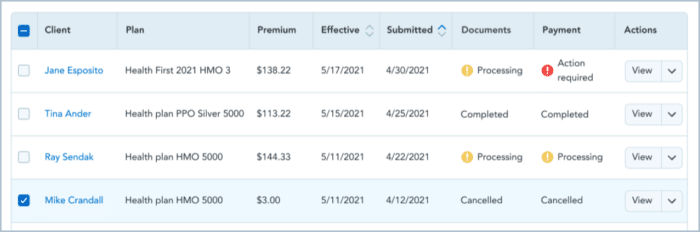
Here’s how multiple plans appear in your Dashboard after the enrollment is done.
After you submit the enrollment, on the Success page, you’ll see multiple payment buttons – one per group.
On the Client Profiles, you’ll also see multiple payment buttons – one per group.
On the Client Profiles, all “Change plans” buttons will point to the Group Shopping page.
On the Client List, you’ll see the plan selected by the primary applicant. Click into the Client Profile to see all the plans.
Subsidies
The subsidy for the household will be portioned out between applicants using a formula from CMS – mostly determined by age of applicant.
When you shop for multiple plans, you’ll see the subsidy portion for the applicants you’re shopping for only.
If particular applicants don’t use all of their subsidy, that overflow subsidy is applied to other applicants. This overflow subsidy is only visible once you get to the Confirm Plans page – it’s not visible during shopping.
Referrals
If the primary applicant’s plan qualifies as a referral, all plans chosen will refer. If it doesn’t, then none will. This is necessary because CMS only allows a single AOR per application.
Edge cases
Here are how certain rare scenarios are handled:
People who live in different zip codes can’t shop the same plans, and therefore can’t be in a group together.
Some plans have special rules that prevent certain people from being in the same group. For example, some may require that applicants reside together to be in a group together. In these cases, we’ll just split them into different groups automatically, while still allowing them to enroll in the plans. If this happens, you’ll see it in the groupings that show on the Confirm Plans page.
If you want to use Multiple Enrollment Groups on an application, you can’t choose a Catastrophic plan for anyone on the application. This is a CMS rule.
If you’re enrolling people in a group where some people qualify for CSR and other’s don’t, then the whole group won’t get a CSR – this is a CMS rule.
http://www.agilityadmin.com/wp-content/uploads/2023/04/Agility-FMO-v2.png00enrollinsurance.com by Agilityhttp://www.agilityadmin.com/wp-content/uploads/2023/04/Agility-FMO-v2.pngenrollinsurance.com by Agility2021-08-12 08:14:002021-08-12 08:14:00HealthSherpa: Multiple Enrollment Groups (Split Policies)
If you use HealthSherpa for your ACA enrollments, you’re familiar with the client table.
In
addition to this top level information, agents are able to click into
each client’s details and see all application information.
But,
what if instead of looking up a specific client’s application, you
wanted to search or analyze all clients who shared a similar application
characteristic?
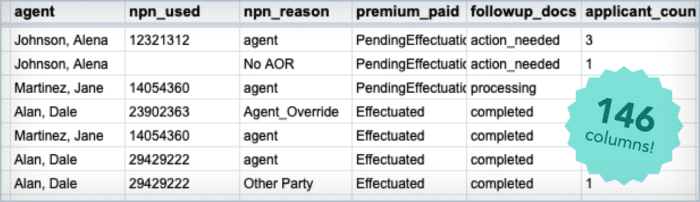
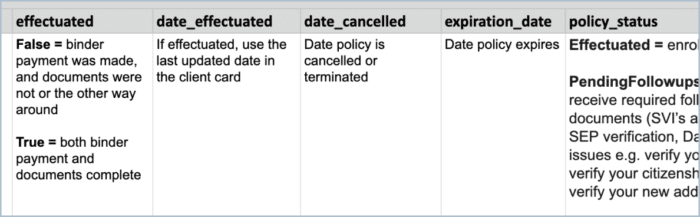
This is where the HealthSherpa Export Report comes into play.
With the Export Report, you can analyze your book of business clients based on:
– Follow up document status
– Number of applicants
– The policy’s status
– New vs renewal applications
– And 146 other fields
In this article, we’ll
cover how agents and agencies can download the Export Report, exciting
new additions to it, and the 4 top ways to start using the Export Report
today.
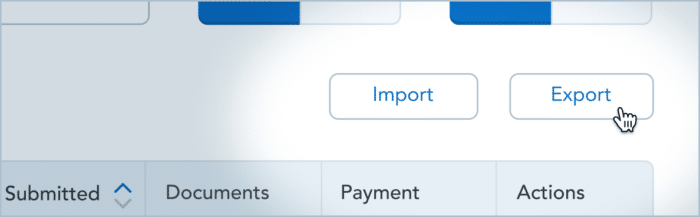
How to download the Export Report
In
the Clients and Leads tab, all you need to do is click the ‘Export’
button. If you are an Agency admin, you can download your full book of
business, across all of your downline, from the Agency tab. Learn more here.
With
all of this information at your fingertips, it can be overwhelming to
figure out where to start. Here are some top ways agents and agencies
use the Export Report, which you can start using today!
1. American Rescue Plan (ARP) premium subsidy outreach. This
COVID-19 relief bill included measures that made subsidies more
generous for clients within 100–400% FPL, and it also made premium
subsidies newly available for clients making more than 400% FPL. Read more about how the law affected the ACA here.
The
Export Report makes it easy to target your ARP outreach efforts. As you
resubmit applications for increased premium subsidies with your
clients, last_submission_date
will populate. To identify clients who have not yet applied an ARP
subsidy, you can filter for applications where this field is blank. See
the “Recent Additions” section below for more detail.
To help agents and agencies, our team put together a resource for prioritized email outreach including templates, which you can download here.
2. Unemployment income outreach. The
ARP also included a measure that qualifies individuals who receive at
least 1 week of unemployment in 2021 to a free Silver plan. As an agent,
the earliest you can help your clients take advantage of this measure
is July 1st. This would be effective on August 1st.
When
you initially enrolled your clients in Marketplace coverage, you had
the option to attest that your client would receive unemployment income
in 2021.
For any applications where you checked that box, has_unemployment_income
will populate with ‘Yes’. You will be able to filter your Export Report
on this column to identify a list of clients to reach out to about
their coverage options.
It’s
important to note that you likely have other clients who qualify for
these free Silver plans. To make sure you don’t miss any clients, you
should also do outreach to your remaining clients. Later in June,
HealthSherpa will provide resources to help with this outreach.
3. Data Matching Issue (DMI) follow up. In
some cases, agents need to upload additional documents to resolve a DMI
post-enrollment. It’s important to resolve DMI’s when they occur in
order for your client to keep their subsidy.
The Export Report includes lots of information on DMI’s, but the most important field for agents is DMI_outstanding_count. By filtering on this field and using last_ede_sync,
you can see which applications need attention, and whether you need a
refreshed sync with the Marketplace to update the status.
After
the current SEP ends on August 15th, it will also be important to check
for outstanding SEP verification issue (SVI) document requests in svi_outstanding_count.
4. Confirm you are the AOR for your Book of Business. Use NPN_reason to see whether the NPN on the application is yours or the ‘Other Party’s’.
In
these instances, you will want to reach out to the client and confirm
whether they worked with a different Agent. If you should still be the
agent for the client, either resubmit the application through
HealthSherpa or do a 3 way call to the Marketplace.
5. Track progress on members-based bonuses or commissions. If you’re eligible for a carrier bonus or commission that’s based on members enrolled, use applicant_count to
add up the total number of members you have enrolled for a particular
carrier. You can search for a specific carrier by filtering on issuer.
Recent additions to the Export Report
In the Export Report legend, you can see where we’ve made these 3 recent additions:
1. American Rescue Plan (ARP) related fields at the very end of the report. You can read more here about how this law expands premium subsidy eligibility and amount. They include:
– Last_submission_date:
Allows you to see which clients have updated their eligibility since
4/1. If it’s blank, that means the application has not been resubmitted
through HealthSherpa for the ARP subsidy.
– FPL_ratio: Exact ratio for the federal poverty level (FPL).
– ARP_subsidy: The estimated new subsidy under the ARP.
– ARP_subsidy_change: The estimated change from the current subsidy.
– Bronze_to_free_silver: Indicates whether the client is eligible for a free silver plan because they are within 100—150% FPL.
– Has_unemployment_income: Identifies applications that included unemployment income as part of the last submission.
2. EDE sync timestamp
(column ER). This field shows you how ‘fresh’ each application’s
statuses are in HealthSherpa. To pull more recent statuses, you will
need to hit the refresh buttons from the client’s table.
3. More details about an application’s NPN. In the past, the npn_reason
field only showed whether the Agent of Record (AOR) was you,
HealthSherpa (in the case of a referral), or ‘Other’. Now, you will also be able to see whether there is ‘No AOR’, or if the NPN is ‘Other Party’s’.
http://www.agilityadmin.com/wp-content/uploads/2023/04/Agility-FMO-v2.png00enrollinsurance.com by Agilityhttp://www.agilityadmin.com/wp-content/uploads/2023/04/Agility-FMO-v2.pngenrollinsurance.com by Agility2021-06-08 06:13:002021-06-08 06:13:005 top ways to use the HealthSherpa Agent Export Report
The short version: Most states are launching a “Covid SEP” where your clients will not need a Qualifying Life Event to enroll. This starts February 15th and ends May 15th.
So, this is just like an Open Enrollment Period—where unenrolled clients
can get enrolled, and currently enrolled clients can change plans.
The long version:
From February 15th – May 15th, 2021, the 36 states using the Federal Marketplace, and several other states, will allow consumers to enroll without having to verify a Life Change (also known as a “Qualifying Life Event”) as they normally would when enrolling outside of Open Enrollment.
How it works
When you enroll a client who does not have a Life Change, simply don’t select a Life Change on the application. If the client does have a legitimate Life Change, you should select it—during this Covid SEP, they will not need to provide any follow-up documentation to prove their Life Change.
If your client has a birth or adoption Life Change, be sure to select it, so that the coverage effective date will backdate to the birth/adoption date.
State details
Some of the states which operate their own exchanges (SBMs) are also participating in this Covid SEP. Here’s the list – we’ve bolded states that have different date ranges:
California: Feb 15th – May 15th (no life change required for uninsured people only)
Colorado: Feb 8th – March 14th (no life change required for uninsured people only)
Connecticut: Feb 16th – May 15th (no life change required for uninsured people only)
Maryland: Now – March 15th (no life change required for uninsured people only)
Massachusetts: Feb 15th – May 23rd
Minnesota: Feb 15th – May 15th
New Jersey: Feb 15th – May 15th
New York: Feb 15th – March 31st (no life change required for uninsured people only)
Nevada: Feb 15th – May 15th
Pennsylvania: Feb 15th – May 15th
Rhode Island: Feb 15th – May 15th
Vermont: February 16th – May 14th (no life change required for uninsured people only – and must be done over the phone, not online)
Washington: Feb 15th – May 15th
Washington DC: Feb 15th – May 15th
FAQ
How do I change plans for a currently-enrolled client?
To change plans for a currently-enrolled client, go to their Client Profile page by clicking their name or the View button:
The Client Profile will show a “Report changes” and “Change plans” button if the client is still within their window to change plans. If not, it will only show the “Report changes” button:
If you want to change plans without updating the application – click Change Plans if it’s there. If it’s not, then click Report Changes, go through the application without changing anything, change the plan, then submit the application.
If you want to change plans and also update the application – click Report Changes, go through the application and make any changes needed, change the plan, then submit the application.
When is the effective date?
There will be accelerated coverage dates, meaning as long as the enrollment is submitted before the end of the month, the coverage effective date will be the 1st of the following month. The earliest effective date for this SEP is March 1st, unless the client qualifies for a retroactive effective date (e.g. due to birth or adoption).
Can I shop early?
You can browse plans now if you’d like to get a head start. But, if you plan to submit without a life change, then wait until February 15th to submit the application.
Why is this Enrollment Period happening?
The Centers for Medicare & Medicaid Services (CMS) determined that the COVID-19 emergency presents exceptional circumstances for consumers in accessing health insurance. Because of this emergency, they’re providing a Special Enrollment Period for individuals and families to apply and enroll in the coverage they need.
Written by Jeff Kriege
Agility Producer Support
(866) 590-9771
support@enrollinsurance.com
http://www.agilityadmin.com/wp-content/uploads/2023/04/Agility-FMO-v2.png00enrollinsurance.com by Agilityhttp://www.agilityadmin.com/wp-content/uploads/2023/04/Agility-FMO-v2.pngenrollinsurance.com by Agility2021-02-12 10:32:002021-02-12 10:32:002021 Covid SEP Overview: Enroll without a life change, Feb 15 through May 15 for *most* states.